Recipe of Chef Vicky Ratnani!
A southern recipe from the state of Kerala.
This is a delicious dish!
Drumsticks are coated with roasted masala and goes very well lemon rice!
Ingredients:
Chicken drumsticks-6,
For the dry roast-
Cinnamon sticks-2,
Green cardamom-5,
Cloves- 4,
Aniseeds-1 tsp,
Cumin seeds-1 tbsp-(I have used 1 tsp)
Fresh coconut -2 tbsp.
For the chicken-
Red chilli-3/4 tsp,
Coriander pwd-1 tbsp,
Turmeric pwd-1/2 tsp.
For the gravy:
Oil- 4 tsp,
Onion-2-small-sliced,
Curry leaves-7 to 8,
Garlic chopped-2 tsp,
Vinegar- 3tsp,
Salt to taste,
water.
Method:
Wash the chicken drumsticks and leave it in a strainer for the water to drain out.
Once the water is drained,make slits on the drumsticks.
Keep in a bowl.
Dry roast cinnamon sticks,green cardamom,cloves,aniseed,cumin seeds for few minutes on a flat pan
.Once the seeds change colour,add the grated coconut and roast for few minutes.
Remove from heat and spread it on a plate to cool.
Once it is at room temperature,grind it in a grinder.
Marinate the chicken drumstick with red chilli pwd,coriander pwd,turmeric pwd and the roasted ground masala.
Mix and rub the spices evenly.
Let the drumstick marinate in the fridge for few hours or you can keep it overnight and make it the next day.
Heat oil and add the mustard seeds.
Once the seeds crackle,add curry leaves and chopped garlic.
Once the garlic is lightly fried,add the sliced onions.
Onions have to be lightly pink and then add 3tsp of vinegar to de-glaze it.
Add the marinated drumsticks with the masala.
Add salt.
On medium high heat,stir the drumsticks for ten minutes.
Keep tossing and turning the drumsticks to evenly brown all sides.
Add enough water to cover half way through.
Mix and let the gravy come to boil.
Cook on low heat till the chicken is tender ( approx 25 minutes)
Once the drumstick are tender,remove the lid.
Raise the heat and dry the water.
Close gas once the water dries out.
Cover and let it stay for 5 minutes in the pot.
Serve and enjoy with lemon rice!
Serves 3
Ingredients:
Ripe mango(less fiber)-2-peeled,pureed and sieved-1/2 cup.
Yogurt-400 gms or 2 cups-make hung curd,
Milkmaid-1/4 cup or more according to the sweetness of the mango,
Salt-a pinch,
Vanilla essence-1/4 tsp(optional),
Digestive biscuits-1 small packet-150 gms,
Butter melted or soft-4 tbsp to 6 tbsp.


Method:(you can make the mango tart in any container of your choice-tart pan,muffin tins.
Tie yogurt in a muslin cloth and let it hang in a tall jar or a glass to drain out the whey.
Keep it in the fridge for four hours.
Squeeze out any whey by hand before removing the cloth.
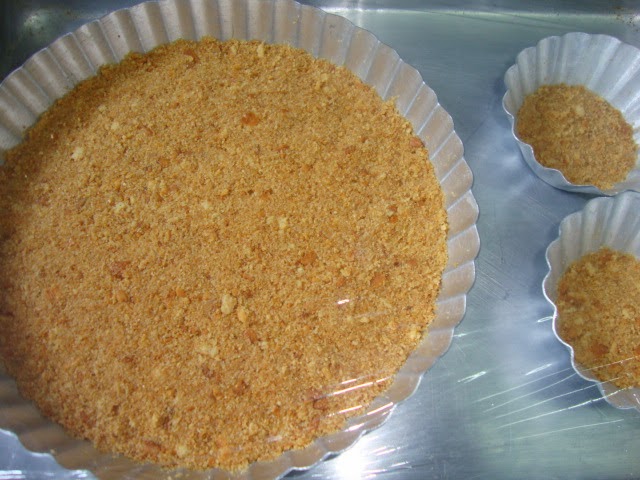
Powder the biscuits by hand or in a blender.
Add butter and mix
.
The biscuit mixture should hold together to form a ball if pressed together,if it scatters then add more butter.
Grease the bottom and sides of the tart pan or muffin tins.
If making in individual bowl,then it does not need greasing.
Spread the biscuit mixture at the bottom of the pan and press it tightly.
Place the tart pan on larger tray and place it in the fridge to harden.
Peel the mangoes and puree the slices in the blender.
Sieve the mango puree through a plastic sieve to remove fibers.
Place the sieved mango puree in the fridge.
Once the hung curd is ready,place it in a bowl.
Beat the hung curd in a bowl with a whisk (30 seconds).
Add a pinch of salt and whisk again.
Add the mango puree and whisk till it incorporates.(few seconds)
Add milk maid-(taste the sweetness of the mixture and add accordingly)
Add vanilla essence (optional).
Mix and pour the mango mixture on the biscuit spread.
Using a knife smooth the top.
Place the tart in a large tray and cover with a plate.
Cover and place the tray in the fridge,to set overnight.
Once the mango tart is set, run a knife around the pan to loosen the edges.
Lift the pan from the bottom and place the mango tart on a board or serving plate.
Cut slices of mango and decorate on top.
Cut slices using a chef knife and always wipe the blade before each cut.
Best eaten fresh as fruit is used but left overs can be kept in the fridge for few days.